Let’s be honest, if you own a Honda Grom, you know it’s more than just a motorcycle. It’s a vibe. But here’s the thing no matter how much we love our bikes, there’s always that voice in the back of our minds saying, “What if I could make it even better?” For a lot of Grom riders, that starts with the sprockets. And trust me, it’s one of the best ways to give your ride a personality upgrade. So, why mess with sprockets? Well, the answer depends on what you want. Maybe you’re craving faster takeoffs at the stoplights or smoother rides when cruising at higher speeds. Changing your sprocket setup lets you fine-tune your Grom exactly how you like it. By the time we’re done, you’ll not only feel confident about upgrading your sprockets—you’ll be excited to hit the road and feel the difference. Let’s dive in!
Table of Contents
ToggleUnderstanding Sprockets
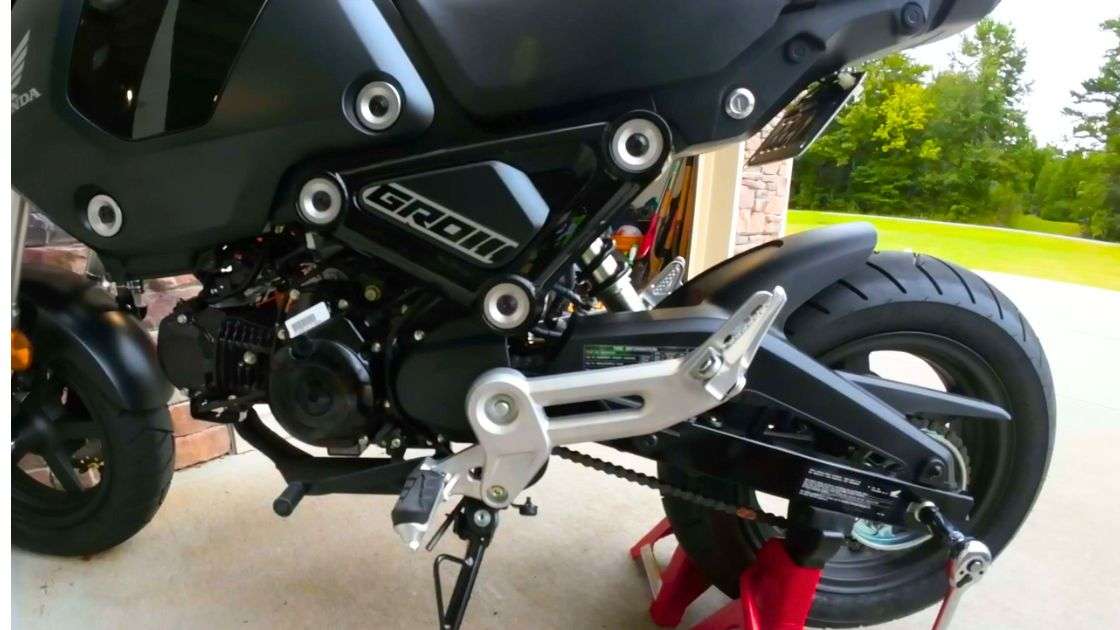
Sprockets are part of your bike’s drivetrain system. They’re the round, toothed wheels that your chain wraps around, and they connect the engine to your rear wheel. In short, they’re what make your bike go. Your Honda Grom has two sprockets: a smaller front sprocket (also called the countershaft sprocket) and a larger rear sprocket. Together, these two work like a team to determine how power from your engine gets translated into speed and acceleration.
How Sprockets Affect Performance
- Front Sprocket (Countershaft Sprocket): The front sprocket typically has fewer teeth than the rear sprocket. Changing its size has a big impact:
- Fewer teeth = more torque and quicker acceleration.
- More teeth = higher top speed but slower takeoff.
- Rear Sprocket: The rear sprocket is the big one that you can’t miss. Changing its size works the opposite way:
- More teeth = more torque and faster acceleration.
- Fewer teeth = higher top speed and smoother cruising.
Gear Ratios 101
The ratio between the number of teeth on your front and rear sprockets is called the gear ratio, and it’s the magic number that determines how your Grom feels when you ride it. For example:
- A higher gear ratio (like 3:1) gives you stronger acceleration but limits your top speed.
- A lower gear ratio (like 2.5:1) gives you a higher top speed but less torque for takeoff.
Stock Sprocket Configuration
If you’ve just picked up a Honda Grom, chances are you’re running the stock sprocket setup. Understanding what the stock setup offers is the first step to figuring out if you need to make changes.
What Is the Stock Sprocket Setup?
Out of the factory, the Honda Grom usually comes with:
- Front Sprocket (Countershaft Sprocket): 15 teeth
- Rear Sprocket: 34 teeth
- Stock Gear Ratio: 34/15 = ~2.27
This means for every revolution of the front sprocket, the rear sprocket rotates approximately 2.27 times. It’s a pretty standard setup that works well for everyday riders who want a mix of acceleration and cruising capability.
How Does the Stock Setup Perform?
Acceleration:
The stock setup provides decent acceleration—good enough for city riding and casual zipping around. However, if you’re into stunting or want more low-end torque, you might find the stock configuration lacking.
Top Speed:
The top speed with the stock sprockets is respectable but not the most efficient for highway cruising. At higher speeds, the engine tends to rev higher, which might leave you wanting a more relaxed ride.
Fuel Efficiency:
The stock setup strikes a balance between performance and fuel economy. It’s efficient enough for daily commutes without guzzling gas.
Versatility:
The default gear ratio is ideal for a wide range of riders, from beginners to experienced Grom enthusiasts. It’s not overly aggressive or sluggish—it’s just neutral.
Reasons to Modify Sprocket Setup
Modifying your Honda Grom’s sprocket setup is one of the most impactful ways to tailor its performance to your needs, whether you’re after faster acceleration, a smoother ride at high speeds, or better fuel efficiency. For city riders or stunt enthusiasts, opting for a higher gear ratio (fewer teeth on the front sprocket or more on the rear) delivers snappier acceleration and more torque, making your Grom feel lively and responsive. If you’re a highway cruiser or long-distance rider, a lower gear ratio (more teeth on the front sprocket or fewer on the rear) reduces engine RPMs at higher speeds, ensuring a smoother and quieter ride with improved fuel economy. Upgraded engines, like a 164cc Grom, can also benefit significantly from sprocket adjustments to balance the added power with optimized speed and torque. Ultimately, modifying your sprockets is an affordable, straightforward way to enhance your riding experience and personalize your Grom’s performance.
Common Sprocket Configurations
Sprocket setups let you customize your Grom’s performance. For quick acceleration, a 14T front and 37-40T rear (higher gear ratio) provide more torque, ideal for city riding or stunts. For better top speed, a 16T front and 32-34T rear (lower gear ratio) reduce RPMs, perfect for highway cruising and improved fuel efficiency. A balanced setup, like 15T front and 36-38T rear, offers a versatile middle ground for general use. Custom setups, such as higher gear ratios for off-road riding or adjusted ratios for rider weight, further optimize performance. The best configuration depends entirely on your riding style and priorities.
Sprocket Setup for 164cc Grom
Upgrading your Honda Grom to a 164cc engine is a game-changer, offering significantly more power and torque. However, the stock sprocket setup isn’t designed to handle the extra performance efficiently. Adjusting your sprockets is crucial to harnessing the potential of the larger engine while maintaining a balance between acceleration and top speed.
Why Modify Sprockets for a 164cc Grom?
The increased displacement delivers more low-end torque and top-end power, but without proper sprocket adjustments, you might not fully experience these benefits. The right setup ensures you’re optimizing both speed and performance for your riding style.
Recommended Configurations
- Acceleration-Focused Setup:
- Front Sprocket: 14T
- Rear Sprocket: 37-40T
- Ideal For: Riders looking for powerful takeoffs, stunts, or urban riding with quick responsiveness.
- Top Speed-Oriented Setup:
- Front Sprocket: 16T
- Rear Sprocket: 32-34T
- Ideal For: Smooth cruising at higher speeds, long highway trips, or riders prioritizing fuel efficiency.
- Balanced Setup:
- Front Sprocket: 15T
- Rear Sprocket: 36-38T
- Ideal For: A mix of acceleration and top-speed capability, suitable for general-purpose riding.
What to Consider
When selecting sprockets for your 164cc Grom, keep in mind:
- Riding Style: Aggressive city riding benefits from higher gear ratios, while highway cruising is better with lower ratios.
- Chain Length: Larger sprockets may require a longer chain.
- Other Mods: Performance upgrades like an aftermarket exhaust or ECU tuning may influence your choice.
Upgrading to 164cc is exciting, but fine-tuning your sprockets is what truly unlocks your bike’s potential. With the right setup, you’ll maximize both the fun and performance of your upgraded Grom.
Selecting the Right Sprocket Setup
Choosing the right sprocket setup depends on your riding style, weight, and terrain. For city riders or stunt enthusiasts, a higher gear ratio (e.g., 14T front, 37-40T rear) provides better acceleration. Highway cruisers will benefit from a lower ratio (e.g., 16T front, 32-34T rear) for smoother rides at higher speeds. A balanced setup like 15T front and 36-38T rear works well for mixed use. Consider factors like your weight, terrain, and any engine modifications, such as a 164cc upgrade, to find the best configuration. Don’t hesitate to test and adjust until your Grom feels just right!
14T Front Sprocket Installation Guide
Changing the sprockets on your Honda Grom might sound intimidating, but it’s actually a straightforward process with the right tools and guidance. Follow these steps to safely and effectively install your new sprockets.
Tools You’ll Need
- Wrench set (preferably socket wrenches)
- Torque wrench
- Chain breaker or rivet tool
- New sprockets (front and/or rear)
- Chain lubricant
- Gloves and safety gear
Step-by-Step Instructions
Prepare Your Bike:
- Park your Grom on a stable surface and use a rear stand to elevate the back wheel for easier access.
Loosen the Rear Wheel:
- Use a wrench to loosen the axle nut and adjuster bolts on the rear wheel. This will allow you to release tension on the chain.
Remove the Chain:
- Use a chain breaker or carefully remove the master link to disconnect the chain from the sprockets. Lay the chain aside but inspect it for wear.
Remove the Old Sprockets:
- Front Sprocket: Remove the bolts or retaining clip holding the front sprocket in place. Slide the sprocket off the shaft.
- Rear Sprocket: Remove the rear wheel and unbolt the rear sprocket from the hub.
Install the New Sprockets:
- Front Sprocket: Position the new sprocket on the shaft and secure it with bolts or the retaining clip.
- Rear Sprocket: Bolt the new sprocket onto the hub, ensuring the teeth face the correct direction. Reattach the rear wheel.
Reconnect the Chain:
- Align the chain with the new sprockets and adjust its length if necessary. Reconnect the master link or rivet the chain back together.
Adjust Chain Tension:
- Use the adjuster bolts to set the correct chain tension. A properly tensioned chain has about 1-1.5 inches of slack.
Tighten Everything:
- Tighten the rear axle nut and use a torque wrench to ensure all bolts are secured to the manufacturer’s specifications.
Lubricate and Test:
- Apply chain lubricant to ensure smooth operation. Spin the wheel to check for alignment and test ride your Grom to ensure everything feels right.
Maintenance and Longevity
Proper maintenance of your sprockets and chain is essential for performance and durability. Regularly inspect for wear, such as rounded sprocket teeth or stretched chains, every 500-1,000 miles. Keep your chain well-lubricated every 300-500 miles, especially after wet or dusty rides, to reduce friction and prevent rust. Ensure the chain tension is correct, with 1-1.5 inches of slack, and clean the drivetrain with a degreaser every 1,000 miles to remove dirt buildup. Replace sprockets and chains together when you notice significant wear or stretching. This prevents misalignment and ensures even wear for long-lasting performance. Following these simple steps keeps your Grom running smoothly and safely!
Potential Challenges and Solutions
Upgrading your sprockets can improve your Grom’s performance, but common issues may arise. Here’s how to address them:
Chain Noise or Rattling: Misalignment or incorrect chain tension can cause noise. Ensure sprockets are aligned, and maintain 1-1.5 inches of chain slack.
Premature Wear: Lack of lubrication or mismatched parts leads to wear. Lubricate every 300-500 miles and replace the chain and sprockets together.
Reduced Performance: Incorrect sprocket size can affect performance. Match your setup to your riding style, prioritizing acceleration, top speed, or balance.
Clearance Issues: Larger sprockets may interfere with the swingarm or chain guard. Check compatibility and adjust the chain length if necessary.
Chain Slipping: Loose or stretched chains cause slipping. Adjust tension or replace overly stretched chains.
Conclusion
From learning about the stock setup to exploring configurations for a 164cc engine, this guide covered everything you need to know. With proper maintenance and attention to detail during installation, you’ll not only enhance your bike’s performance but also extend the life of your drivetrain. Now it’s your turn to use the insights and tips from this guide to experiment and find the perfect sprocket setup for your Grom. With a bit of effort, you’ll transform your ride into something that’s not just functional but thrilling.
Happy riding! If you have questions or need more guidance, don’t hesitate to reach out or explore additional resources.
FAQs
What is the stock sprocket setup for a Honda Grom?
The Honda Grom typically comes with a 15-tooth front sprocket and a 34-tooth rear sprocket, resulting in a gear ratio of approximately 2.27.
What’s the best sprocket setup for better acceleration?
To boost acceleration, consider a 14-tooth front sprocket paired with a 37-40 tooth rear sprocket. This setup increases the gear ratio, providing more torque for quicker takeoffs.
How can I increase my Grom’s top speed through sprocket changes?
For higher top speeds, opt for a 16-tooth front sprocket and a 32-34 tooth rear sprocket. This configuration lowers the gear ratio, allowing the engine to maintain lower RPMs at higher speeds.
How does a 164cc engine upgrade affect sprocket selection?
Upgrading to a 164cc engine increases power and torque, necessitating sprocket adjustments to balance performance. Many riders find that a 15-tooth front and 35-tooth rear sprocket setup offers a good mix of acceleration and top speed for this engine size.
How often should I inspect and maintain my sprockets and chain?
Regular maintenance is crucial. Inspect your sprockets and chain every 500-1,000 miles, lubricate the chain every 300-500 miles, and clean the drivetrain every 1,000 miles to ensure longevity and optimal performance.
How do I choose the right sprocket setup for my riding style?
Consider your typical riding conditions and preferences. For city riding and stunts, a higher gear ratio (e.g., 14T front, 37-40T rear) offers better acceleration. For highway cruising, a lower gear ratio (e.g., 16T front, 32-34T rear) provides a smoother ride at higher speeds.

