Changing the oil in a Honda Grom is an easy task. It keeps the engine healthy and running smoothly. You can do it yourself with just a few tools and about 10 minutes. Regular oil changes help the engine last longer. They also make sure the bike runs at its best.
This guide will show you how to change the oil step by step. It is written for beginners. Every step is clear and simple. Let’s get started.
Table of Contents
ToggleGather Necessary Materials
You need the right tools and supplies before starting. This will make the process smooth and easy. Here’s a list of what you’ll need:
Tools
- Oil Drain Pan: Use a small container to catch the old oil. It should fit under the bike easily.
- Socket Wrench Set: This is for loosening and tightening bolts. A standard set works fine.
- Funnel: Helps pour new oil into the engine without spilling.
- Torque Wrench: Optional but helpful. It ensures you tighten bolts to the right level.
- Clean Rags or Towels: Use these to wipe off oil spills or clean parts.
- Gloves: Keeps your hands clean and protects from hot oil.
Parts
- Engine Oil: Honda Grom uses SAE 10W-30 motorcycle oil. Check for JASO MA certification on the bottle. This means it is safe for motorcycles. Honda recommends GN4 oil, but other brands work too.
- New Washer: Replace the washer on the drain plug. It prevents leaks after the oil change.
- Oil Filter or Screen: This depends on the Grom model. Newer ones have a replaceable filter, while older models use a screen.
Why This Step Matters
Getting everything ready saves time. It also avoids frustration if you miss something halfway through. Double-check the list before starting.
Prepare the Motorcycle
Getting the motorcycle ready is an important step. It ensures the process is safe and the oil drains properly. Follow these steps to prepare your Honda Grom.
Warm Up the Engine
Start the engine and let it run for about 3–5 minutes. This heats up the oil, making it flow out easily. Be careful not to let the engine get too hot. Warm oil drains better, but hot oil can cause burns.
Park the Motorcycle
Place the bike on a flat, solid surface. Use the kickstand to keep it stable. If you have a rear stand, use it to lift the back wheel. This keeps the bike upright and makes it easier to work.
Turn Off the Engine
Once the engine is warm, turn it off completely. Let the bike sit for a minute. This allows the oil to settle and prevents any accidents while working.
Safety First
Make sure the area is well-lit and clean. Keep a fire extinguisher nearby if you are working in a garage. Wear gloves to protect your hands from hot oil and dirt. Always work in a ventilated area.
Drain the Old Oil

Removing the old oil is the heart of this process. It clears out dirt and debris from the engine. Follow these steps to drain the oil properly.
Locate the Drain Plug
The drain plug is a small bolt under the engine. It’s near the bottom of the bike, easy to spot. Place the oil drain pan directly under the plug. This will catch the oil as it flows out.
Remove the Drain Plug
Use a socket wrench to loosen the bolt. Turn it counterclockwise until it comes out. Be ready for the oil to flow quickly. Let it pour into the pan. Hold the bolt carefully to avoid dropping it into the oil.
Let the Oil Drain Completely
Wait until the oil stops dripping. This can take a few minutes. Be patient. Getting all the old oil out is important for the engine’s health.
Inspect the Drain Plug
Check the drain plug for metal shavings. This can happen if there’s wear inside the engine. Wipe it clean with a rag. If you are using a magnetic drain plug, clean off any metal particles it may have collected.
Clean the Area
Wipe the area around the drain hole with a clean rag. This keeps dirt or old oil from mixing with the new oil.
Clean the Oil Screen and Spinner (if applicable)
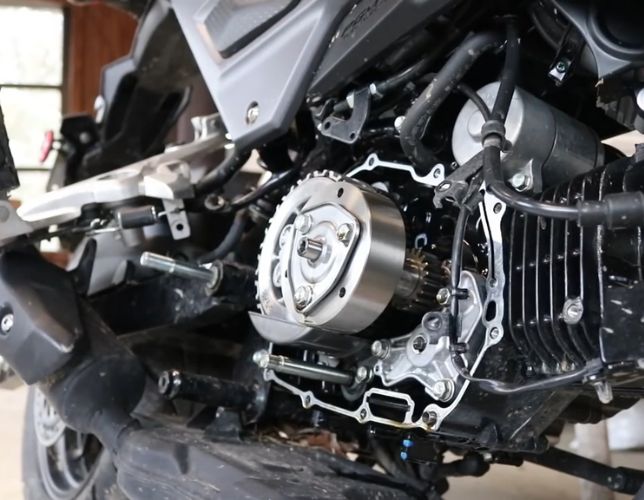
The oil screen or spinner is responsible for catching debris and dirt that could harm the engine. Keeping them clean ensures the engine runs smoothly. This step depends on the model of your Honda Grom.
For First- and Second-Generation Groms (2014–2020)
These models use an oil screen instead of a replaceable filter. Here’s how to clean it:
- Locate the Oil Screen
The oil screen is inside the right-side engine cover. You’ll need to remove this cover to access it. - Remove the Engine Cover
Use a socket wrench to remove the bolts holding the cover in place. Be careful, as a small amount of oil may still spill out. - Take Out the Oil Screen
The oil screen is a small, mesh-like filter. Pull it out gently. - Clean the Screen
Wash the screen in a safe solvent or with clean engine oil. Remove any dirt, debris, or metal particles stuck in the mesh. Dry it completely before placing it back. - Reinstall the Oil Screen
Put the screen back in its slot and reattach the engine cover. Tighten the bolts securely.
For Third-Generation Groms (2021–Present)
These models have a replaceable oil filter. Here’s what to do:
- Locate the Oil Filter
The oil filter is located on the right side of the engine, near the drain plug. - Remove the Old Filter
Unscrew the filter carefully using an oil filter wrench or by hand. Be ready for a small amount of oil to spill. - Install the New Filter
Apply a thin layer of fresh oil to the rubber gasket on the new filter. Screw the filter in place by hand until it’s snug. Do not over tighten.
Why This Step Matters
Cleaning or replacing the oil filter or screen removes harmful particles. This step keeps the engine oil clean for longer, improving overall engine performance.
Reinstall the Drain Plug
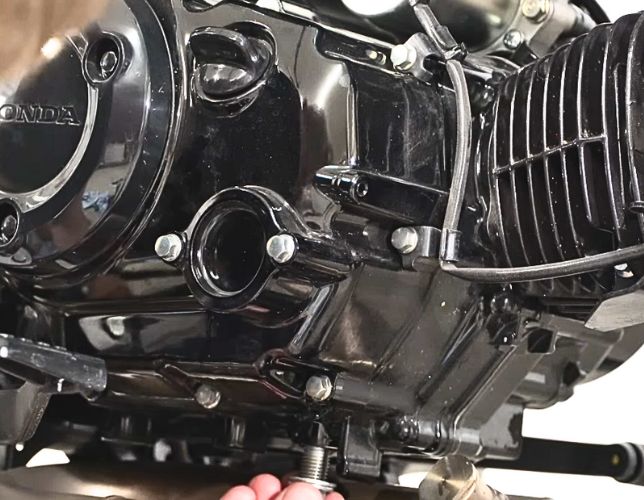
Once the old oil is out and the screen or filter is cleaned or replaced, it’s time to put the drain plug back in place. This step ensures your engine is sealed and ready for fresh oil.
Replace the Washer
Always use a new sealing washer on the drain plug. The washer prevents leaks by creating a tight seal. Skipping this step can lead to oil dripping from the engine later.
Reinsert the Drain Plug
Align the drain plug with the hole at the bottom of the engine. Screw it in by hand first. This prevents cross-threading, which can damage the threads and cause leaks.
Tighten the Plug
Use a socket wrench to tighten the drain plug securely. Do not overtighten it. A torque wrench is helpful for this step. For most Honda Grom models, the recommended torque is around 24 Nm (check your manual to confirm).
Check for Proper Fit
Once tightened, wipe the area around the drain plug with a clean rag. Look for any gaps or loose fittings. A properly seated drain plug should sit flush against the engine, with no visible space.
Add New Oil

Now that the old oil is out and the drain plug is secured, it’s time to add fresh oil. This step brings life back to your engine and ensures it runs smoothly.
Choose the Right Oil
Honda Grom engines require SAE 10W-30 4-stroke motorcycle oil. Look for oil with a JASO MA certification. This ensures the oil is safe for your bike’s clutch system. Honda recommends their GN4 oil, but other brands with the same specifications work too. Use the best oil for your honda grom.
Locate the Oil Filler Cap
The oil filler cap is on the right side of the engine, near the top. Twist it counterclockwise to remove it. Set it aside in a clean place to avoid contamination.
Pour in the Oil
Use a funnel to pour the oil into the engine. Start with about 0.9 liters (1 quart), as this is the typical capacity for the Honda Grom. Pour slowly to avoid overfilling or spilling.
Check the Oil Level
After pouring, check the oil level using the dipstick:
- Wipe the dipstick clean.
- Reinsert it fully, but do not screw it in.
- Pull it out and look at the oil level. It should be between the lower and upper marks.
Add more oil if necessary but do not exceed the upper mark. Overfilling can cause problems for the engine.
Reattach the Oil Filler Cap
Once the oil level is correct, screw the filler cap back on tightly. Make sure it is secure to prevent leaks.
Why This Step Matters
Fresh oil keeps the engine lubricated and reduces friction. It also removes heat and prevents wear on internal parts. Using the right oil in the correct amount ensures the engine works efficiently.
Final Checks
Now that the fresh oil is in, it’s important to perform a few final checks to ensure everything is in place. This step helps prevent issues and ensures the bike is ready to ride.
Start the Engine
Turn the ignition on and start the engine. Let it idle for about 2–3 minutes. This allows the new oil to circulate through the engine. Keep an eye on the oil filler cap and drain plug areas for any signs of leaks.
Turn Off the Engine
After idling, turn off the engine and let the bike sit for a minute. This gives the oil time to settle so you can check the level again.
Recheck the Oil Level
- Remove the dipstick and wipe it clean.
- Insert it back fully without screwing it in.
- Pull it out and check the oil level again. It should be between the lower and upper marks.
If the level is low, add a small amount of oil and repeat the process until it’s just right.
Inspect for Leaks
Carefully inspect the areas around the drain plug and oil filter. There should be no drips or oil seeping out. If you see any, tighten the components slightly, but avoid overtightening.
Clean Up
Wipe down any oil spills on the bike or the floor. A clean workspace makes it easier to spot leaks or problems later. Dispose of the used rags properly.
Dispose of Used Oil Properly
After completing the oil change, the used oil and any replaced parts must be disposed of safely. This step protects the environment and keeps your workspace clean.
Collect the Used Oil
Pour the old oil from the drain pan into a sealed container. You can use an empty oil bottle or any sturdy container with a tight lid. Be careful not to spill during this process.
Gather Other Waste
If you replaced the oil filter or used an oil-soaked rag, collect these items. Place them in a plastic bag to keep them contained.
Take It to a Recycling Center
Used motor oil is harmful to the environment and cannot be thrown in the trash. Most automotive stores and recycling centers accept used oil for free. Check online or contact a nearby location to confirm they accept used oil and filters.
Why Proper Disposal Matters
Pouring oil down a drain or into the ground pollutes water and soil. Recycling used oil allows it to be cleaned and reused, which is better for the planet.
Store Safely Until Disposal
If you can’t take the oil to a recycling center immediately, store it in a safe place. Keep it out of reach of children and pets. Label the container to avoid confusion.
Additional Tips for a Successful Honda Grom Oil Change
To keep your bike running at its best, follow these extra tips and best practices during and after your oil change.
Stick to the Oil Change Schedule
Regular oil changes are essential. For older Honda Grom models, change the oil every 2,500 miles or sooner if you ride in harsh conditions. Newer models may have different recommendations. Always check your owner’s manual for the exact interval.
Check the Oil Between Changes
Even if you’ve just changed the oil, it’s a good habit to check it regularly. Use the dipstick to monitor the oil level and condition. If the oil looks dark or smells burnt, it may need to be replaced sooner.
Use the Right Tools
Using the correct tools, like a torque wrench, ensures the job is done properly. Tightening bolts to the recommended torque prevents leaks and avoids damaging threads.
Consider a Magnetic Drain Plug
A magnetic drain plug catches tiny metal particles that may float in the oil. It’s an inexpensive upgrade that helps keep the engine oil cleaner over time.
Warm Up the Bike Before Each Ride
Cold oil is thicker and doesn’t flow as easily. Warming up the bike for a few minutes before riding ensures the oil circulates properly, protecting the engine.
Monitor Engine Performance
After changing the oil, pay attention to how the engine feels and sounds. A smooth and quiet engine is a good sign. If you notice unusual noises, vibrations, or oil leaks, double-check your work or consult a mechanic.
Use High-Quality Oil
Investing in good-quality oil pays off in the long run. It reduces engine wear, improves performance, and extends the life of your bike. Always stick to the recommended specifications for your Honda Grom.
Keep a Maintenance Log
Write down the date and mileage of each oil change. This helps you stay on top of the maintenance schedule and provides a record if you ever sell the bike.
FAQs About Honda Grom Oil Change
How Often Should I Change the Oil in My Honda Grom?
For older Honda Grom models, the recommended interval is every 2,500 miles or once a year, whichever comes first. Newer models may have different intervals, so always check your owner’s manual.
What Type of Oil Should I Use?
Use SAE 10W-30 motorcycle oil with JASO MA certification. This ensures compatibility with your bike’s clutch system. Honda recommends their GN4 oil, but other high-quality brands that meet the same standards work fine.
How Much Oil Does a Honda Grom Take?
The Honda Grom typically requires about 0.9 liters (1 quart) of oil. Always use the dipstick to check the oil level after filling to avoid overfilling.
Do I Need a New Washer for the Drain Plug?
Yes, replacing the sealing washer every time you change the oil is a good practice. It ensures a tight seal and prevents leaks.
What’s the Difference Between an Oil Filter and an Oil Screen?
First- and second-generation Groms (2014–2020) use an oil screen, which needs cleaning during oil changes. Third-generation Groms (2021–present) have a replaceable oil filter that should be changed with the oil.
How Can I Dispose of the Used Oil?
Take the used oil to a local recycling center, auto parts store, or authorized disposal site. Never pour it down a drain or on the ground.

